Can't find what you're looking for?
Start a conversation
Chat conversation only works if you have concented to all cookies. Modify your cookie settings here or send an email to team@twentythree.com
When delivering video content to your viewers, you have the option of showing Actions alongside the videos. Actions are pieces of text, images or videos that can be shown directly in your video player before, during or after playback of your video.
The Actions feature gets it name from "Call To Action" as this is exactly what it allows you to do: To further drive the engagement of your audience by showing clickable pieces of content in the video player that suggest actions for the viewer to take.
Actions can take many forms depending on your use case. Examples of ways to use them include:
Each action can be set up on four different levels:
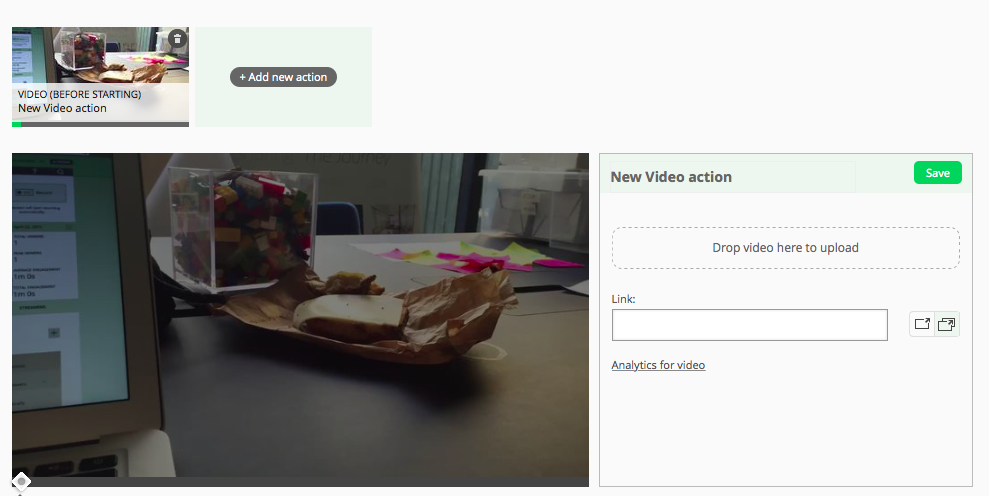
To set up an action for a video, logon to the backend of your video website and navigate to the video and select "Actions" in the sidebar. Here, you will get an overview of all actions that have already been set up for this video, and you can add a new action by clicking the "Add new action"-button and choosing one of the action types that appear in the dropdown menu (see section about "Action types" further down).
The process for setting up actions is the same for the other levels, though you will find the settings for the individual levels in different places:
When adding or editing an action, you will be presented with a range of settings for you to adjust to your needs. Note that the available settings are different for different action types, but the following settings are available for most of them.
To the left in the editing interface, you will see the preview area for the action. You can adjust the size of the action by clicking any of the corners and dragging it until the actions has the desired size.
You can place the action anywhere on top of the video by clicking and dragging the action within the boundaries of the preview area.
Size and position cannot be specified for the action types "Product", "Video" and "Video ad", since these action types come with predefined settings for these properties.
The bottom of the preview area is a timeline, where you can set the timing of when the action should be shown, and when it should disappear. Simply click and drag the leftmost handlebar to adjust the action's start time - or the rightmost handlebar to adjust end time. The start and end times for an action can be
For the action types "Video" and "Video ad" the start time must be set to either "Before starting" or "After finishing", and these actions do not have an end time, since the video or video ad always will be played in its entirety.
You have the option of giving the action a name. It is usually a good idea to give actions descriptive names to make them easier to identify when looking at an overview of actions.
The link settings is where you specify the url that the viewer should be taken to, if he or she chooses to click the action. With the buttons to the left of this setting you can decide whether the link should open in a new browser window, or if it should open the link in the current window. Note that if you choose to have links open in the current browser window, playback of the video will end, if the user clicks the action.
The link settings is not available for the actions types "Video ad" and "Banner ad", since the clickthrough url will be loaded directly from your adserver instead. For the action type "HTML" you have the possibility of defining your own link inside the action.
The default setting for pause mode is that your action does not interfere with the playback of the main content video. The action simply shows up at the time you have specified while the content video keeps playing. Optionally you can choose one of the two other pause modes:
Pause the video: With this setting, the video will automatically pause, when the action is first shown. This naturally draws extra attention towards the action, and can be used to make sure that the viewer receives the message before continuing playback of the video
Only show when paused: This settings tells the action that it should only show up, whenever the video is paused. With this setting, the action will only be visible and clickable, when playback of the video is both paused and within the start and end time of the action.
To accommodate different use cases, we have defined a set of Action types. On top of the common settings described above, each action type has its own collection of settings that you can read about in the following walkthrough of action types.
A text action allows you to show a text-box on top of your video, and to have that box be clickable for the viewer. Other than position, size and timing of the action, text actions have a number of other settings associated with them:
As expected, this is the text that will be shown on top of your video. There is no limitation of the length of this text, but any part of the text that does not fit inside the action box will simply be hidden.
You can choose between four different sizes for the text in your action. To make sure that the action looks the same no matter how big your video player is, the text will scale with the player. By choosing a good text size, you define the starting point of this scaling.
By clicking the text color button, you can choose between the available colors or simply input the exact color code that you want.
By default, the text will be centered inside the action box, both horizontally and vertically. By clicking the alignment buttons, you can have the text be left-aligned or right-aligned, as well as aligned to the top or the bottom of the action box.
The same way as you define text color, you can pick a background color for the action box. By setting the transparency of the background, you can have this color be solid or transparent—or you can choose to remove the background by having it be completely transparent.
Your text action have optionally have a border around it. This border can either be shown anytime the action is shown, or you can have it show up only when the viewer hovers the mouse cursor over it.
A product action is a way for you to show discrete images of your products (for example when the products are mentioned in your videos) take the viewer to any URL (maybe directly to your web store) when the image is clicked. Product actions come with predefined styling, showing them in the upper left corner of the video. The images will be stacked below each other, if more than one product action is shown at the same time.
To set up a product action, simply drag and drop an image file on top of the upload area and specify the link URL.
Link actions allow you to make certain areas of your video clickable without the action having any content in itself. You can think of a link action as being the same as a text action—just without any text and without a background. Link actions can be position and sized the same way as other actions, but it may be a good idea to choose to have a border shown around the action to give the viewer a hint that the area is clickable.
With video actions, you can play a video either before or after the main content video. This is an easy way to show company identity, campaign or commercial videos as prerolls or postrolls. To set it up, simply drag and drop a video file on top of the upload area and optionally specify a link, if you want the video to be clickable. On the timeline in the bottom of the preview area, you can then choose to have the video shown either before or after the main content video. Simple drag the handle to either the left or the right side of the timeline.
When you have uploaded a video to be used as a video action, the video file will be transcoded to make sure that it is playable in all browsers. Because of this, it may take some time for the video action to be ready, but you can at any time check if the transcoding is still going on by clicking on the action and looking for the message "The video is currently being prepared for playback".
An image action lets you put an image on top of your video and have it link to any URL you want. Simply drag and drop an image file on top of the upload area, type in a link URL and choose how the image should be aligned inside the action box. Then, you can position and resize the image in the preview area and set the timing of the action on the timeline.
When necessary, images in image actions will be scaled to fit within the boundaries of the action box. However, they will never be scaled to a size larger than the original file.
Video ad actions act in a lot of ways similarly to regular video action in that they are simply videos that are shown either before or after playback of the main content video. The difference is that rather than uploading a video yourself, you simply put in an ad URL given to you by your ad service provider, and the video ad will be loaded and shown as either a preroll or postroll.
You can optionally show a countdown for video ads so the viewer gets a hint about the duration of the ad, and you can choose to allow for dismissal of the ads, which will insert a "close"-button on top of the ad. This is set up in the player settings for the player that you use for playing your videos.
TwentyThree supports ads that are served through the VAST 2.0 standard, and the player reports ad impression event in accordance with this standard.
As video ad actions are similar to regular video actions, banner ad actions behave similar to image actions. This means that you simply specify the ad url from you ad service provider, and the banners will be loaded dynamically and shown in the video player. Like image actions, banner ad actions can be positioned and resized in the preview area, and you can set the timing of the action by choosing a start time and end time on the timeline.
In the same way as video ad actions, you can allow the viewer to dismiss banner ads by choosing this in the settings for your video player.
TwentyThree supports ads that are served through the VAST 2.0 standard, and the player reports ad impression events in accordance with this standard.
HTML actions are a way for you to have full control of the content of the action box. Simply put in any HTML that you wish to be inserted into the action, and then specify the position, size and timing of the action in the preview area.
For all actions that have a link property, instead of typing in a URL that should be opened when the action is clicked, you can specify a command that should be run. There are two different commands that can be executed in the player:
For setting a property to a specific value. This command requires that there is defined a setter for the property. In the action's link field, simply specify the command on the form "$set:property:value" (without the quotes).Examples:
For setting a boolean property to the the opposite of its current value. This requires that there is defined both a getter and a setter for the property, accepting and returning boolean values. The toggle command can be specified on the form "$toggle:property" (without the quotes).Examples:
There is a wide range of properties that have defined getters and setters in the player. To get a sense of which ones are available, take a look at the player's source code. If you wish to define you own getters and setters, you should look into building a customized player.
If the built-in action types do not meet your needs completely, you have the option of creating your own action types. Read more about this here.